Delicious, Engineered

Engineer by Trade. Chef by Passion.

  • About
  • Recipes
  • Travel
  • Contact
8F45E550-AF8D-4A3D-9FD4-07352F47718D.JPG

Chicken, Mushroom, & Pea Pie

January 31, 2021 by Errynne Bell in Entrees

Prep Time: 1 hour

Cooking Time: 1 hour

Total Time: 4 hours

Serving Size: 2 Large Pies

This recipe will make you feel like you’re on the Great British Baking Show, or at a feast in the Great Hall with Harry Potter! I know it did for me! This pie is warm and hearty and checks all the boxes on a cold or rainy day.

Special Equipment

Food Processor

2 Round Au Gratin Dishes

Rolling Pin

Pastry Brush

Ingredients

  • 2 ½ C + 2 Tbsp All Purpose Flour, Divided

  • ¾ Tsp Diamond Crystal Kosher Salt

  • 1 C Kerrygold Unsalted Butter, Cold and Cubed

  • ½ C – ¾ C Cold Water

  • 2 Tbsp Olive Oil

  • ¾ C Onion, Small Diced

  • 6 Oz Cremini Mushrooms, Small Diced

  • 1 ¼ C Low-Sodium Chicken Stock

  • 8 Oz Boneless, Skinless Chicken Breast, Diced Into ¼ Inch Pieces

  • ¾ C Frozen Peas

  • ½ Tsp Rosemary, Minced

  • ¼ C Minced Parsley

  • Salt & Pepper

  • Nonstick spray

  • 1 Egg, Beaten With 1 Tbsp Cold Water

  • Maldon Flaky Sea Salt

How To

  1. In a food processor, pulse the 2 ½ cups of flour and the salt together a few times. Add the cold, cubed butter to the food processor. Pulse a few more times until the butter is about pea sized. Slowly add ½ cup of cold water, a bit at a time, while continuing to pulse. Keep pulsing until the dough starts to come together and form a ball. If the dough seems a bit dry, add more water, a tablespoon at a time. When the dough is formed, split it into 4 roughly equal pieces, wrap in plastic, and refrigerate for at least 2 hours.

  2. Meanwhile, start on the filling. Warm the olive oil over medium high heat until warm. Add the chopped mushrooms and onions. Sauté 5-7 minutes until the onions begin to soften and the mushrooms begin to brown. Add the chicken and allow it to brown 2-3 min without stirring. Stir, and let it cook another 2-3 min. Salt and pepper gently. Add the 2 tbsp flour and stir to combine. Slowly add the chicken stock, stirring as you go, to avoid any lumps. Add the peas, rosemary, and parsley. Stir to combine and cook 3-5 minute until the gravy thickens. Taste the filling and adjust the salt and pepper as necessary. Remove it from the heat and allow the filling to cool to room temperature.

  3. Preheat the oven to 350° F.

  4. Spray the au gratin dishes with nonstick spray and lightly dust all sides and the bottom. Tap out any excess flour.

  5. Remove the dough from the refrigerator. On a floured surface, roll out the dough into a circle and until the dough is about ¼ - ⅜ inch thick. Place two of the 4 pieces into the dish, making sure it has no holes and hangs over the sides of the dish a bit. You want a bit extra. Put approximately half of the filling into each pie, but don’t overfill. If you have extra, that’s fine, save it for another time. Wet the top edges that overhang with a bit of water. Put the other two rolled-out pieces over dough over the pies. Go around the edge, gently crimping with your fingers to ensure that the pie is sealed. Cut off any excess dough hanging over the side, I find that kitchen shears are really useful for this. Double check again and make sure the pie is sealed.

  6. Cut 3 small slits into the top of the pie to allow the steam to escape. Brush the top with the egg wash. Sprinkle a bit of Maldon salt on top.

  7. Bake on the middle rack for 1 hour until golden brown, rotating halfway through. Allow it to cool at least 5 minutes before attempting to remove the pie from the au gratin dish. The easiest way to remove the pie, if you sprayed and floured it enough, is to turn the pie upside down in your hand, tapping and gently allowing the pie to fall out on its own, and then placing it right side up on a plate. WARNING – the very HOT gravy might seep out of the top slits when you do this, so I recommend not using your bare hand and instead using a clean paper towel or dishtowel to do this. If the crust looks soggy, as if the gravy leaked during the cooking process, I would not recommend attempting to remove the pie. Just eat it right out of the dish!

Adapted from the Chicken & Mushroom Pie recipe in the Unofficial Harry Potter Cookbook.

January 31, 2021 /Errynne Bell
Chicken, Peas, Pie, Mushrooms
Entrees
20210110_000733432_iOS.jpg

Carne Asada

January 31, 2021 by Errynne Bell in Entrees

Prep Time: 15 min

Cooking Time: 10 min

Total Time: 24 hours

Serving Size: 6 to 8 people

 I’ve been using this carne asada recipe for nearly a year, and it is ALWAYS a hit. I’ve had many people tell me it’s the best carne asada they’ve ever had, and who am I to argue?

The Protein

This recipe is for steak (hence the “carne”), but you can use this marinade for any protein. Swap the flank steak for chicken, for example. Use a meat tenderizer on the chicken until it’s about ½ inch thick, skip the scoring step, and proceed with the rest of the recipe. For fish or shrimp, skip the scoring and only marinate it for 10-15 minute just before you cook it.

I often make a full batch of the marinade and use half with chicken, and half with steak.

Meal Planning

This asada marinade freezes really well, making this an excellent make-ahead recipe. Freeze immediately after step 3. The day before you’re ready to cook it, put the bag in the refrigerator. It will marinate as it defrosts.

Special Equipment

Blender or food processor

Ziploc bags

Ingredients

  • 1 C Olive Oil

  • 2 Tbsp Whole Cumin Seeds

  • 10 Garlic Cloves

  • 1 Bunch Cilantro, cut at the base of the leaves

  • 4 Tbsp Lime Juice

  • 4 Tbsp Orange Juice

  • 1 – 7 oz Can Chipotle in Adobo, Embasa Brand

  • 2 Tbsp Tamari

  • 4 Tsp Ancho Chili Powder

  • 4 Tsp Kosher Salt

  • 1 Tbsp Honey

  • 3 Lbs Flank or Skirt Steak

  • Lime wedges, chopped cilantro, chopped onions, and other toppings

How To

  1. Pat dry the steak with paper towels. Lightly score in a cross-hatch pattern on both sides of the steak.

  2. Warm a skillet on medium high heat. Add the cumin seeds and garlic. Gently toast 3-5 minute until the garlic is lightly browned and the cumin seeds are fragrant.

  3. Combine everything except the steak in a food processor and blend until smooth. Split the steak and marinade equally into two gallon Ziploc bags.

  4. Refrigerate and let the carne asada marinate for 6 to 24 hours.

  5. About an hour before you cook, let the carne asada sit on the counter to bring it to room temperature.

  6. Heat a grill or grill pan to high heat. Sear both sides 3-5 min to the desired doneness, medium rare is recommended.

  7. Let the steak rest for at least 10 minutes. Thinly slice. Serve as you like it!

Serving Suggestions

Serve with corn or flour tortillas, sour cream, lime wedges, chopped cilantro, chopped onion, salsa, cotija, guacamole, or really any other taco topping that you like.

This also goes great in a burrito bowl, or as a salad.

Inspired by a carne asada recipe on the Food & Wine website.

January 31, 2021 /Errynne Bell
Steak, Tacos
Entrees
Comment
5B986722-3587-40C6-99B8-E3C933ECA2D7.JPG

Braised Spiral Sausage with Peppers and Onions

July 29, 2020 by Errynne Bell in Entrees

Prep Time: 10 min

Cooking Time: 30 min

Serving Size: 3 to 4 portions

Savory, salty pork sausage. Sweet caramelized onions. This dish is so basic, but so delicious.

The Sausage

I used a Brazilian spiral pork sausage for this recipe, but you can use nearly any sausage you’d like. If spiral sausage is unavailable, you can use links as well. Make sure you’re using a cased, uncooked sausage.

Special Equipment

3 qt or 5 qt Braiser

Ingredients

  • 2 Tbsp Olive Oil

  • 1 Yellow Onion

  • 1 Yellow Bell Pepper

  • 1 Red Bell Pepper

  • 1 lb Uncooked Spiral Sausage

  • 2 Tsp Smoked Paprika

  • ½ Cup Chicken Stock, divided

  • Salt & Pepper

  • ¼ Cup Parsley

How To

  1. Heat the oil in the braiser on medium heat.

  2. While the oil warms, medium slice the peppers and the onions. Add them to the braiser. Add the smoked paprika, and salt and pepper to taste.

  3. Cook the peppers and onions about 8 minutes until they begin to soften, stirring every so often.

  4. Push the peppers and onions to the side of the pan and carefully add the sausage to the braiser. Allow the sausage to begin undisturbed on one side, 5 to 7 minutes. Stir the vegetables every so often to ensure they don’t burn.

  5. Add ¼ cup of the chicken stock to the braiser to help loosen the sausage from the pan. Carefully flip the sausage and cover for 5 to 7 more minutes.

  6. Remove the cover and check the moisture in the pan. If it seems dry, add a splash more chicken stock.

  7. When the sausage is cooked through, cooking time will depend on the size of the sausage, remove the braiser from the heat and sprinkle with roughly chopped parsley. Enjoy!

Serving Suggestions

Pair this with roasted potatoes and some fresh or sautéed greens. You could also serve this with some crusty French bread or rolls.

July 29, 2020 /Errynne Bell
Sausage, Bell Peppers
Entrees
1 Comment
D73B1660-FC7B-42BD-B11B-B2226D618E17.JPG

Spicy Crab Noodles

June 05, 2020 by Errynne Bell in Salads, Entrees

Prep Time: 10 min

Cooking Time: 20 min

Serving Size: 4 Entrée Portions

This is a super quick and flavorful dinner that you can whip up in a pinch with just a few ingredients.

The Crab

Food only tastes as good as the ingredients you use. This can be no truer than when it comes to seafood. I would not recommend using canned crab for this recipe. Instead, look to lump crab in your store’s refrigerated seafood section. The larger the lumps of crab, the better.

Shrimp would also be a good substitute if crab is not available in your area.

The Noodles

I used instant ramen noodles, without the soup base packet, for this recipe. You can use any type of light pasta that you have in the pantry.

Special Equipment

Microplane/Zester

Wok – an all-purpose pan or sauté pan would also work well

Ingredients

  • 4 – 3.5 oz Packages of Instant Ramen

  • 1 Cup Canola Oil

  • 6 Cloves Garlic

  • 1/4 Cup Ginger

  • 2 Tbsp Thai Red Chili Paste

  • 1 Lb Shitake or Cremini Mushrooms

  • 1 Cup Chicken Stock

  • 4 Tbsp Soy Sauce

  • 12 Oz Lump Crab – Fresh, Not Frozen

  • 1 Lime

  • ½ Cup Peanuts

How To

  1. Put 4 cups of salted water into a pot and heat on high until boiling. Remove the ramen noodles from their bag and cook per the package instructions, about 3 minutes typically. Drain and run cold water over the noodles to stop the cooking process.

  2. In the wok, heat ½ cup of oil on medium high until hot. The oil is ready when a drop of water sizzles in the oil. While the oil is warming up, prepare the garlic and ginger.

  3. When the oil is hot, add the garlic, ginger, chili paste, and mushrooms. Make sure to turn the mixture often as garlic can burn quickly, leaving an unpleasant bitter taste.

  4. Add the cooked ramen to the pan and toss to coat. Spread the noodles out evenly in the pan and pour ¼ cup of the oil over the top of the noodles. Let the noodles sit 3-4 minutes until they
    begin to become crispy at the edges. Mix everything together and let it sit for another 3 minutes. Mix it one more time, add the last ¼ cup of oil, and let it sit for another 3 minutes. Toss one more time, and let it sit for 3 minutes one more time.

  5. Zest and then juice the lime into the noodles. Add the chicken broth and soy sauce, toss to coat.

  6. Add the crab and mix everything together, continue cooking for 2 minutes.

  7. Serve warm, topped with chopped peanuts. Enjoy!

This recipe is adapted from Food & Wine’s Spicy Wok-Fried Crab Ramen.

June 05, 2020 /Errynne Bell
Crab, Pasta, Lime, Nuts
Salads, Entrees
IMG_0042 - EDITED.jpg

Lemon Thyme Infused Beet & Orange Salad

June 05, 2020 by Errynne Bell in Side Dishes, Salads, Entrees

Prep Time: 15 min

Cooking Time: 60 min

Serving Size: 4 Side Salads or 2 Entree Salads

This recipe is fresh, colorful, and packed with flavor!

The Beets

Look for beets all about the same size, to ensure even cooking time. Beets that are 3 to 4 inches in diameter would be a good size for this recipe.

Special Equipment

Vegetable Peeler

Rubber Gloves – These come in handy to avoid staining your hands, but you can of course work without them if you don’t have any.

Tin Foil

Ingredients

  • 2 Medium Beets

  • 1 Lemon

  • 8 Sprigs of Thyme

  • 2 Medium Oranges

  • Greens, such as spinach

  • Feta or Other Mild Cheese

  • Smoky, Spicy, & Salty Nuts

How To

  1. Preheat the oven to 375°F.

  2. Cut off the greens and the room of the beet, scrub off any excess dirt under cold water. Put on those rubber gloves and peel the beets.

  3. Slice the lemon into 4 slides, you will have extra.

  4. Place a lemon slice on each side of the beet and 4 sprigs of thyme on top. Wrap each beet individually in a piece of tin foil. Put the beets in the oven and baked for 45 – 60 minutes. Pull the beets out at 45 minutes and check for doneness. You can slice one in half and check the
    middle. It should be soft, but still firm.

  5. When the beets are done, open the foil and let them cool for 10 minutes. Slice into 1/2" inch thick slices.

  6. While the beets cool, cut the rind off of the orange and slice into ½ inch thick slices, removing any seeds.

  7. Place your bed of greens, I like using spinach or mixed baby greens.

  8. Place beets and oranges, alternating. Top with the nuts and a sprinkle of crumbled cheese. Enjoy!

Serving Suggestions

I didn’t include a dressing here as the salad is definitely good on its own. If you’d like a dressing, a lemon vinaigrette would pair splendidly.

This goes great with chicken, fish, or shrimp. Recently, I brined chicken breast overnight and then marinated it in our favorite marinade 30 minutes before we put it on the grill.

IMG_0052 - EDITED.jpg
June 05, 2020 /Errynne Bell
Beets, Oranges, Nuts, Greens
Side Dishes, Salads, Entrees
1 Comment
A7B7F393-8032-45F0-9365-22D15D221571.JPG

Lemon Dill Pasta with Fish

June 01, 2020 by Errynne Bell in Entrees

Serving Size: 2 people

Cooking Time: 20 min

Prep Time: 10 min

I was very excited to find fresh dill bunches at the store the other day which inspired me to cook this lovely, fresh, and healthy recipe.

The Vegetables

I used green beans because that’s what I happened to have in the fridge. Peas or edamame would also be a delicious compliment.

Frozen veggies would also work well but skip the vegetable boiling step. You can microwave the frozen veggies in a bit of water for 1 minute or per the package instructions.

The Fish

You can use any white fish for this recipe. I used Mahi Mahi because that’s what I happened to have in the freezer. Look for 2 filets of approximately the same size to make cooking a bit simpler.

Chicken breast would also work well.

The Pasta

I used an edamame pasta for a healthier and more protein-rich meal, but you can use a typical wheat spaghetti or fettuccine, if that’s what you happen to have in the pantry.

Special Equipment

Dual Citrus Juicer

Cookie Sheet with Silicone Mat

Ingredients

  • 2 White Fish Filets

  • 2 Tbsp Olive Oil

  • Salt & Pepper

  • 6 oz Edamame Pasta

  • 2 oz Green Beans

  • ½ Onion

  • 1 Garlic Clove, Minced

  • ½ Cup Dry White Wine

  • ¼ Tsp Red Chili Flakes

  • 1 Medium Lemon, Juiced

  • ½ Plain Greek Yogurt

  • 2 Tbsp Milk

  • 2 Tbsp Fresh Chopped Dill

How To

  1. Preheat the oven to 350°F.

  2. Heat a pot of salted water on high until boiling. *PRO TIP*: Add a bit of oil to the pot of boiling water before cooking, this will keep the pasta from sticking. Cook the pasta according to the package instructions. Rinse the pasta under cold water after boiling to prevent overcooking.

  3. Heat a smaller pot of salted water on high until boiling. While the pot comes to a boil, cut the green beans in a slant in approximately ¾” length pieces. When the water is boiling, add the green beans and blanch for 2 minutes. Drain, rinse under cold water to stop the cooking, and set aside.

  4. If you are using frozen fish, make sure it is fully defrosted before use. Completely dry the fish and salt and pepper both sides.

  5. Heat the olive oil on medium high heat until hot. The oil is ready when a small droplet of water into the oil causes a rapid sizzle. When the oil is ready, place the fish into the pan. Sear each side for 3 to 4 minutes. You should not need to scrape the fish off the pan, it will release itself when the sear is complete. After searing, place the fish on a cookie sheet with a silicone mat and put it into the oven for another 5 to 7 minutes, depending on the thickness of the filet.

  6. Turn the pan down to medium and add the onion. Cook for 5 to 7 minutes until it begins to brown, add the garlic. Cook for 1 additional minute, be careful not to burn the garlic.

  7. Add the white wine and use a spatula or wooden spoon to scrape any of the brown bits into the liquid. These brown bits are the “fond”, and that’s where all the flavor is!

  8. Add the chili flakes, to your preference. Squeeze in the lemon juice with the citrus juicer. Add the green beans to the pan. Sauté for 2 minutes.

  9. Remove the pan from the heat and add the yogurt, milk, and dill. Stir to combine thoroughly.

  10. Put the cooked pasta into the saucepan and combine thoroughly.

  11. Plate the meal with the pasta first, and your lovely filet on top.

Serving Suggestions

This goes very well with the rest of that bottle of white wine!

This recipe is adapted from Food & Wine’s Lemon and Dill Chicken Pasta.

June 01, 2020 /Errynne Bell
Fish, Pasta, Lemom, Green Beans
Entrees
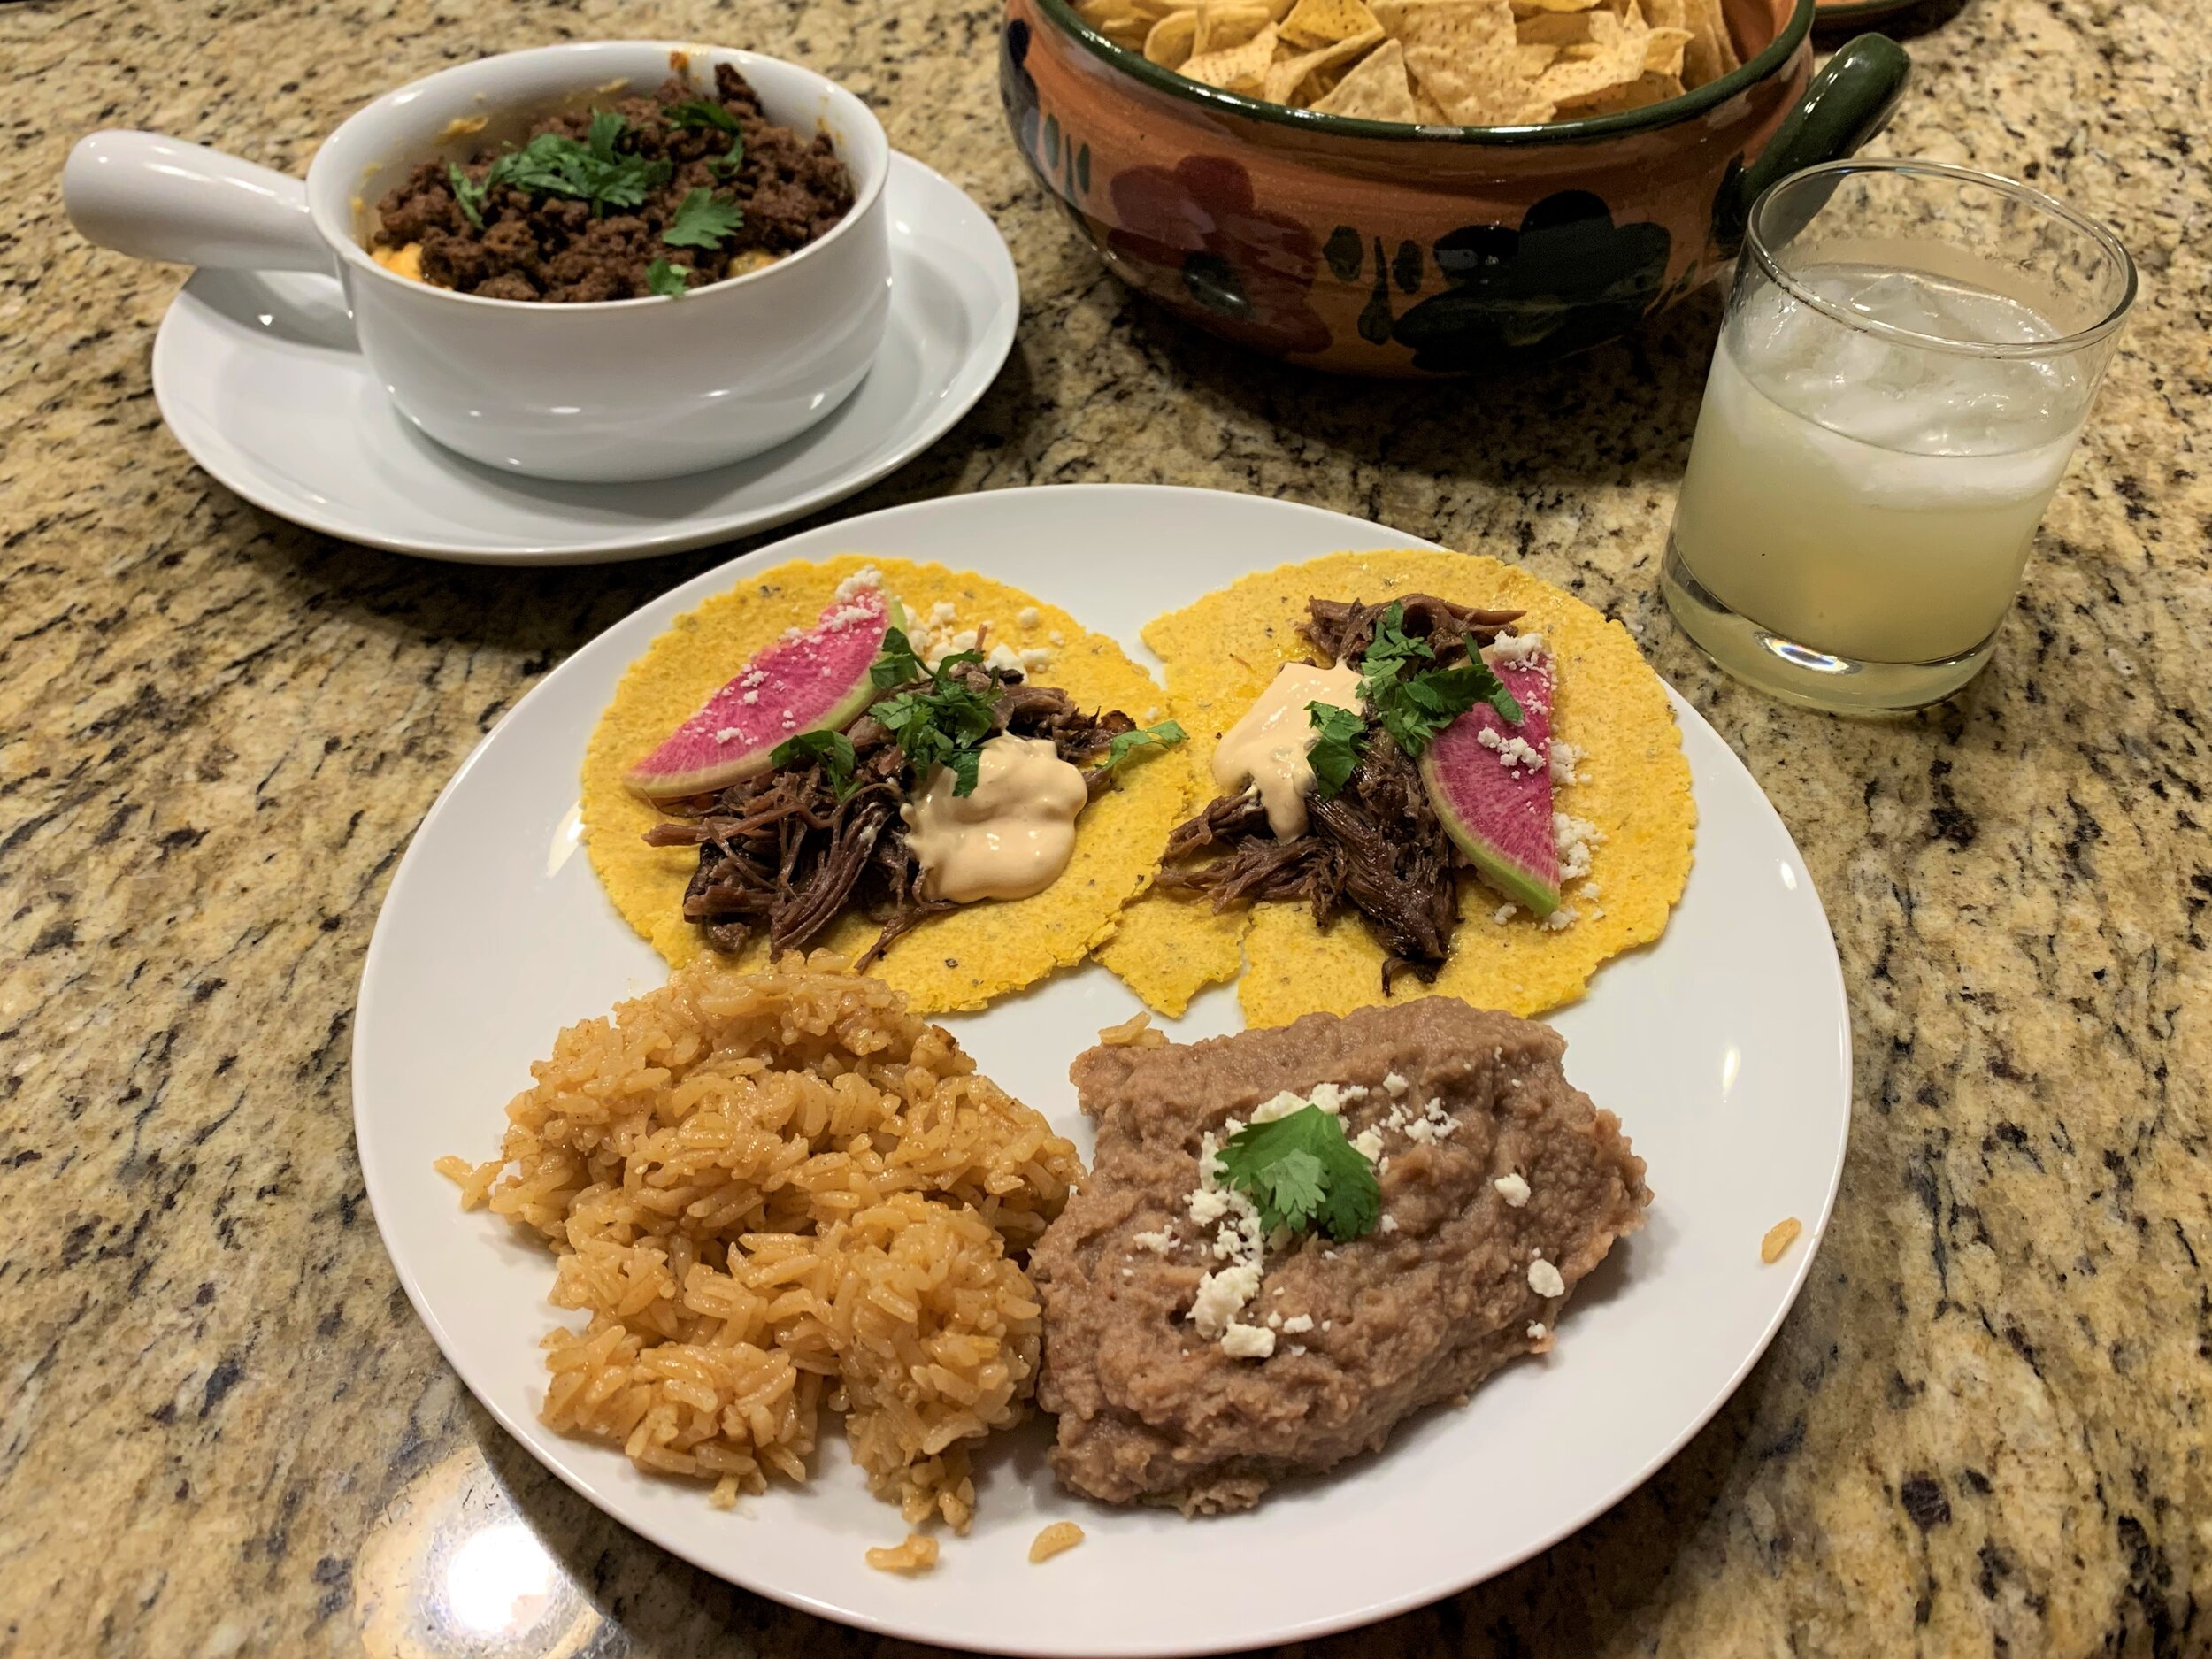
2020.05.05 Taco Tuesday Short Rib Tacos

Beer and Red Chili Braised Short Ribs

May 10, 2020 by Errynne Bell in Entrees

Prep Time: 45 Min

Cooking Time: 8-10 Hours

Serving Size: 6 people, 2 short ribs each

In our house, we love Mexican food. This year, Cinco de Mayo occurred ON Taco Tuesday! That doesn’t happen too often, so it’s cause for celebration. For this recipe, I combined two recipes I have used in the past for some fantastic flavor!

This recipe makes plenty of short ribs, either for a small group or to use throughout the week for a number of other things. I used the leftovers for pizza toppings, burrito bowls, with eggs, and many other things!

The Protein

The protein for this meal is short ribs. I love short ribs because they braise so well and absorb so much flavor! They are also cheap, which is always a plus. I like to buy short ribs whenever they’re on sale and keep them in the freezer until I’m ready to use them.

When picking short ribs, don’t be afraid to be picky at the butcher counter. I look for ribs that are all about the same size and have lots of meat on the bone. They’re typically 4”-5” log and about 3” thick. I purchase my short ribs from the Whole Foods butcher because the quality of the meat is superb.

The Braise

This braise for this recipe is a combination of beer and a red chili sauce. I wanted a Mexican flavor, but also wanted to use some dark beer we’ve had sitting around the house for months. Neither of us loved to drink the dark beer I used, but I has excellent flavor for cooking and the alcohol helps break down the toughness in the meat.

You can use any dark beer you have, though I would avoid dark beers with obscure flavors. I used a Chocolate Bock for this recipe. If you want to splurge, Chimay Red or Blue are some of my favorite beers to cook with because they have so much flavor!

Special Equipment

8 Qt Crock Pot - A large crock pot always comes in handy! If you have a smaller one that’s fine, but I would scale down the quantity.

French/Dutch Oven - I love my Le Creuset Dutch (technically French) ovens, but there are other brands out there that are more budget friendly.

Blender - Investing in a quality blender is important, particularly for recipes like this. I recommend this one as it blends well and comes with various attachments for different tasks.

Ingredients

  • 3 tbsp Olive Oil

  • Salt & Pepper

  • 9 -12 Short Ribs, approximately equal in size

  • 4 Cups Chicken Stock

  • 4 Dried Guajillo Chilis

  • 4 Dried New Mexico Chilis

  • 1 Dried Chipotle Chilis

  • 2 Yellow Onions

  • 5 Cloves of Garlic

  • 1/2 Cup Brown Sugar

  • 24 oz. of Dark Beer

  • Tortillas, Radishes, Cilantro, Sour Cream, or Other Taco Toppings

How To

  1. Place the Dutch Oven on your stove top, add olive oil. Heat oil on medium high heat until hot.

  2. While the oil heats up, rinse and fully dry the short ribs with paper towels. The meat must be dry to get a good sear. Salt and pepper thoroughly, don’t be shy with the seasoning!

  3. When the oil is hot, brown the short ribs in batches. Be careful not to overcrowd them. Be patient during the browning process, don’t move the short ribs around until they’re ready. You’ll know they’re ready when they release themselves from the pan. If you have to scrape it off, it’s not done yet. Brown all 4 sides, they should be a deep brown color. Transfer short ribs directly to the slow cooker so that you can collect any juices in the slow cooker. While the short ribs are browning in batches, start making the red chili sauce.

  4. Put 2 cups of the chicken stock in a microwaveable bowl and microwave for 2 minutes.

  5. To prepare the chilis, remove the ribs and the seeds. “Toast” the chilis by microwaving them for 20 seconds, in 10 second intervals. Submerge the chilis in the hot chicken stock and cover with plastic wrap for at least 10 minutes.

  6. Peel the onions, roughly chop, and add them to the blender. Peel the garlic and add it to the blender. Add the brown sugar to the blender as well.

  7. Lastly, add the reconstituted chilis and their soaking liquid to the blender. Blend it all together until smooth. If you find that it’s dry, add more of the chicken stock.

  8. Once all the short ribs are browned, arrange them in the slow cooker with the bones vertical. This allows the liquid to surround the meat evenly.

  9. When all of the ribs are done browning, remove some of the excess fat or oil from the dutch oven, but be careful not to remove any of the brown bits. Add the pureed chili sauce to the dutch oven to deglaze the pan. Cook on medium heat for 5 minutes.

  10. Remove the chili sauce from the heat and add the beer. Stir to combine.

  11. Pour the chili beer sauce over the short ribs. Make sure that the short ribs are fully submerged in the braising liquid. If not, add some of the extra chicken stock until the short ribs are fully submerged.

  12. Turn the slow cooker to low and let the short ribs cook for 8 to 10 hours.

  13. After they’re done, the short ribs should fall right off the bone (literally)! Shred the meat and you’re ready to go!

Serving Suggestions

I served the braised short ribs with corn tortillas, watermelon radish (for a nice crunch! regular radish works fine too), homemade chipotle cream (sour cream, lime juice, some sauce from canned chipotle in adobo), and cilantro.

On the side we had Spanish rice, refried beans, tortilla chips, and queso fundido.

This, of course, pairs well with a strong, homemade margarita!

May 10, 2020 /Errynne Bell
Tortillas, Beans, Rice, Beef
Entrees
Comment

Powered by Squarespace